

It’s a sad fact that bees don’t always make it through the winter. Varroa mites are the root cause more often than not, but there are a lot of things that can go wrong: The colony could be too small to keep warm, have diseases, be overrun with varroa, or not have enough stores (or even have plenty, but get trapped in their cozy cluster too far away from their food). Sometimes, a winter checkup results in finding out that a colony has died. If you find a dead hive, these three things should be done as soon as possible:
- Close up the entrance(s) so that it can’t be robbed out; if the hive died from disease, you don’t want that spreading to other colonies.
- Perform a hive autopsy – open up the hive and go through it frame by frame to determine the cause of death. While it’s sad to have to do this, it will help you determine if the equipment can be reused for other hives, and is a great learning experience.
- Depending on the autopsy results, throw out anything that can’t be reused, and clean up and store the rest of the equipment. Even if you’ve closed the entrance to prevent robbing from bees, other pests such as wax moth could already be inside and cause a mess of your frames, so you’ll want to store things properly.
My First Dead-out
On New Years Eve 2020, I went out to tap the outside of my hives and listen for the reassuring buzz signifying life within. Sadly, my small hive made no sound. I had been worried about this colony’s ability to survive winter since they had a late season queen supersedure and were quite small. It was a warmish day, though, so I decided to move ahead with the cleanup and autopsy.
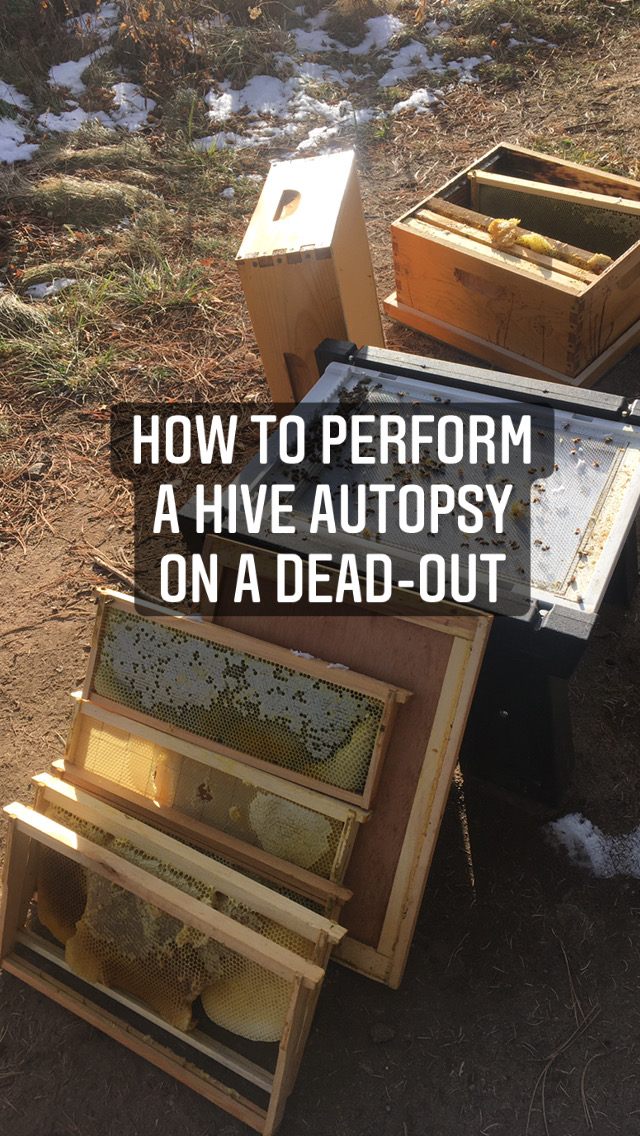
How to Perform a Hive Autopsy
There are many things to look for while doing a hive autopsy. I created a hive autopsy checklist that you can use to help guide you through things you should be looking for, and discuss the steps in detail through the rest of this post.

The Maine State Beekeepers Association also has a nice guide linking symptoms to possible causes and what corrective and preventative actions you can take. Ultimately, you are looking for all the clues that can point to why your colony didn’t make it, so that you can learn from this and prevent it from happening to a future colony. The general steps in a hive autopsy are as follows:
- Observe the area around the hive. Is the hive intact? Look for any footprints of animals/pests (even humans) that could be clues to something (or someone) pestering your colony. Check the ground in front of the hive for an excessive amount of dead bees. If there are a lot of dead bees in front of the hive with their tongues sticking out (or lots of bees out front shaking and behaving oddly), they may have been exposed to pesticides, though an exposure large enough to kill an entire hive is more common in agricultural areas and during the active season. This was all normal for me.
- Open up the hive. Look at the outer and inner covers, paying attention to the presence of moisture and/or mold, and any bad smells. If it’s winter, wet bees are dead bees. If you see actual water drops in the hive, excessive moisture may have been what killed your colony, and you can be proactive next year by providing better ventilation. Mold could also indicate excessive moisture, although bees that have been dead a while may become moldy just due to the natural moisture within them. Bad smells could come from a wet hive, decaying bees if they’ve been dead some time, or could be indicative of disease. My hive was dry and smelled normal.
- Start pulling frames. Observe the frames – have the honey stores been used up? If so, they may have starved. Another indication that bees have starved to death is if they are all found dead head first in the cells. I had a few of these who apparently starved far away from the cluster, but the cluster itself was not demonstrating this and was located right over honey stores (and right under the fondant patties I had on top of the frames). I concluded that starvation was not my colony’s cause of death.

A handful of bees are seen head-first in the comb cells. - Examine the brood chamber. If there are eggs/larvae/capped brood, make note of anything that doesn’t look (or smell!) right. Shriveled or off-color larvae and perforated/sunken brood cappings may indicate one of the foul brood diseases; a bad smell points to AFB in particular. If AFB was the cause of death, don’t reuse equipment and be very careful in the clean up (wear gloves, don’t mess with your live colonies at the same time, etc.) so you don’t accidentally spread anything. EFB is more debatable, some beekeepers will reuse that comb and some won’t.

A few cells still contained capped brood in my dead-out. Any bees that had died mid-emergence have their tongues out like the one in this photo.
Pay attention to the brood pattern; if it’s patchy consider the foul brood diseases or parasitic mite syndrome (caused by overload of varroa mites). If it’s spring, summer, or fall and all the capped brood that is present is drone brood (i.e. no worker brood), or there are no eggs, queen issues may have been the problem. If you have a ring of dead capped brood that looks black and is in the larval stage instead of the pupae stage, that brood may have been chilled due to a cluster that was too small to keep the edges of the brood chamber warm. If it’s a winter dead-out, you may also have very little (or no) brood just because of the time of year, so keep looking. My dead-out was during our brood-free period; there were only a handful of worker brood cells, but I did note that some dead emerging workers had their tongues out. Adults being unable to emerge from the cells like this can be a sign of parasitic mite syndrome. - Look into empty brood cells. Do you see small, white patches on the cell walls? This is varroa feces. If you see a lot of it, your colony may have been lost to varroa collapse. I saw some of this.
- Examine the cluster. How big is it? Do you see a queen? Small size may mean the population wasn’t large enough to keep warm and they froze; lack of a queen could point to some sort of queen failure. The cluster in my small hive was smaller than my fist (ideally a cluster should be more like the size of a basketball to make it through a Colorado winter) – the photo below was more than half of the entire cluster. I started pulling bees off the edge of the cluster and did find the queen in the center though.

The cluster size of my dead-out was very small – less than 100 bees in total! This photo shows more than half of the cluster. - Examine the bottom board. Look for dead bees, varroa mites, brown/yellow stains, or excessive wax bits. Lots of dead bees could suggest that the cluster was too small and the outer layer of bees died and fell out of cluster, while a large amount of varroa mites may point to varroa collapse as the cause of death.

The bottom board on my dead-out hive. There were lots of dead bees.
Brown/yellow goop or stains on the bottom board (or on the front of the hive and landing board) may indicate the colony had dysentery or nosema. Excessive wax bits could indicate robbing has been happening, although this is unlikely to be the cause of death and more likely to be robber bees taking advantage of an already weak colony. This is also the case if you see a lot of wax moth; wax moth is an opportunistic pest and the colony was probably already weak. In mine, the amount of dead bees on the bottom board was 3x the size of the cluster still on the frames! There were a handful of varroa mites that had fallen through the screened bottom board, from the oxalic acid (OA) dribble treatment I did earlier in December. The amount of mites that dropped was certainly troubling considering the size of this tiny colony. In fact, I had 2-3x more mites drop in the 24 hours after my December OA treatment in this hive than I did in the same period after treatment on my big hive – which has a cluster larger than a basketball!

This pull out varroa tray from my dead-out hive shows the area under the cluster. The roundish brown specks are varroa mites – I count 9-10 in this photo, which is a lot for a colony of less than 100. The liquid on this is from the Oxalic Acid dribble I did earlier in the month, not moisture from the hive. - Examine the dead bees. Do they have deformed wings, K-wing, or look black and greasy? They may have had viruses, which are spread by mites. I spotted a handful of bees with shriveled or what might be K-wings, but not an overwhelming amount.

Two dead bees with potential deformed wing virus (see the shriveled wing on the left bee?) and possible K-wing (on the right bee, the left wing is separated out into it’s two parts, forming a “K” shape).


At this point, you should have a pretty good idea of the cause of your colony’s collapse. If you’re uncertain about diseases, you can test for a lot them. There are test kits you can buy for EFB and AFB, or you can send some samples away for testing at a bee lab like the USDA Bee Research Lab in Maryland.
Cleaning Up a Dead-out
If you feel confident that your dead-out was not caused by underlying disease that can be spread, the frames and any extra honey can be saved and given to current or future colonies. Clean up all equipment you’re going to store by removing all dead and decaying bees, and freeze frames before storing if you’re concerned about possible presence of wax moth or other pests. I just keep my extra frames in airtight containers in a shed outside; since this was a winter kill and our winter nights get well below freezing right now, that does the trick to kill any potential wax moth eggs etc. already existing in the frames, and the airtight containers should prevent any new pests from finding them.
My Autopsy Results
After my autopsy was complete, I came to the conclusion that ultimately, my colony was too small to survive and create the heat needed to make it through our winter nights. The cause for this was probably two-fold:
- Their crazy 2020. Just like us humans, this colony had a rough year – it started as a package, the queen flew away as I was releasing her (beekeeper-mistake – aka “learning experience”); I bought a queen, and they eventually superseded her. If you’re keeping track, yes, this colony had 3 queens in the course of less than 6 months. They were slow to build up and were still pretty small in fall (though not THIS small!).
- The ever-devastating varroa mite. In fall, this colony had a varroa count that was on the threshold of requiring treatment. Since they were still a smaller colony than the required colony size listed on the labels for any of the potential treatments, and had just hatched a new queen, I decided not to treat. With a new queen, I knew I’d have a brood break which should help with a varroa infestation, but it doesn’t look like that worked well enough.
Ultimately, I believe these two factors combined to result in a varroa-weakened colony that either was too small to get through winter to begin with, or perhaps did not have enough time to grow the winter bees and thus has been regularly declining in population since fall. At the time of the colony death, the cluster was far too small to create enough heat to survive winter.
While finding a dead colony makes for a very sad day, doing an investigation into the cause provides a useful learning experience for the beekeeper. Use what you learn during your autopsy to become a better beekeeper for your future colonies! If I ever have the same situation again, I will choose to treat with a half-dose treatment for a smaller colony rather than trying to depend on a brood break. I would also consider bolstering the population in the late summer/early fall with a frame or two of bees from another colony.
Have you ever autopsied a dead-out hive? What did I miss for things to look out for? Please share your experiences in a comment below.
P.S.
Sometimes… you may have a surprise ending; stay tuned for part 2 of this story, titled: “Zombees: What if your dead-out isn’t a dead-out?”
though perhaps an apropos endingfor such a totally bad year[2020],I am so sad& sorry to hear of your NewYear’s eve adventure.& can’t wait to read the ending to the story about the zombees.[cliff-hanger]!
Thank you for the wonderful job you do writing& illustrating[great specific photos] this website.The information is very clear,well thought out& well-written.& invaluable to both newbees& already knowledgeable beekeepers. Even as your journey takes you down some difficult paths,your passion for this little,but vitally important incredible creature shines through!&I very much appreciate how you turn disaster into a learning experience& get something out of it& turn it into a gift to others!just as the bees are a gift to our world!Thank you!Keep up the GREAT work!I salute you!
Aw thank you for the kind words! 🙂
[…] recently wrote about the hive autopsy I performed on New Years Eve 2020, when I determined that my colony didn’t make it because they […]